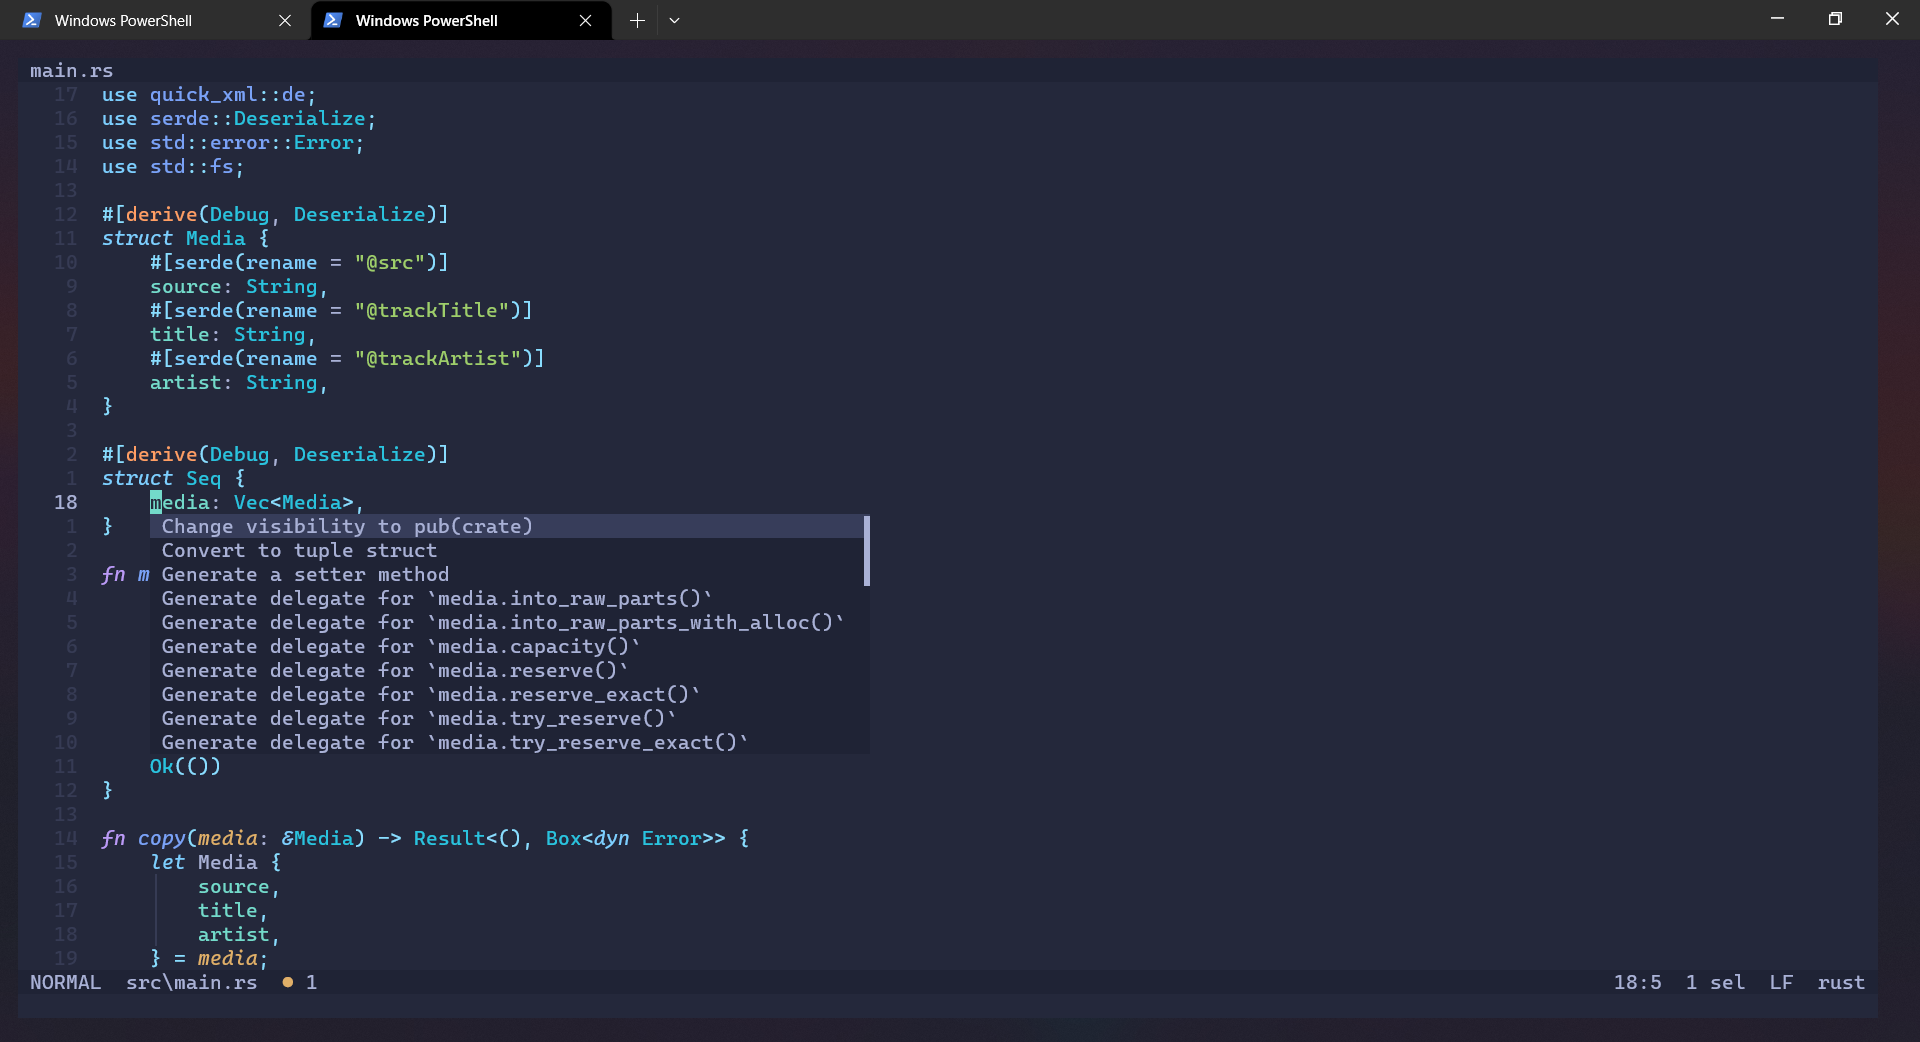
最近发现了一个用 Rust 写的 Vim-like 编辑器 Helix,用有强大的性能和各种开箱即用的功能。经过短暂时间的体验,我认为 Helix 已经可以在大部分领域替代 Vim/Neovim/VS Code。
作为一款用 Rust 写的编辑器,Helix 自然拥有优异的性能。得益于其丰富的内置功能,Helix 无需插件就可以完成许多 Vim 只能用插件做到的事,并且还通过 Rust 获得了性能上的优势。现在我的 Neovim 安装有 coc.nvim、vim-visual-multi 等插件,共十个,启动需要延迟近 0.5 秒,虽然已经显著快于 VS Code,但相比 Helix 的小于 0.1 秒,还是稍显逊色。(当然这可能与我现在用的是 Windows 有关)
虽然现在(2023年4月8日)Helix 还没有插件系统,但未来的插件系统大概率会用 WASM 实现,相比 Vim Script 以及 Neovim 用的 Lua 等脚本语言会更快。
首先 Helix 和 Vim 一样都是模态编辑器,具有多种模式,最基本的操作思路是一样的,比如都使用 hjkl 进行移动,都使用 i、a 等进行插入,都使用 y,d、p 进行复制删除粘贴。但是 Helix 采用了 selection -> action 模式,比如向右删除 3 个字符需要按 3ld 而不是 d3l,先选择在操作,就我个人而言,这种方式确实更舒适。
另外,Helix 的命令有丰富的提示,而且还可以通过 <space> ? 打开命令面板查找命令,并带有相关键位提示,包括自定义的键位。
UI Helix 使用了 TOML 作为配置文件格式,以声明式代替了 Vim Script 的命令式。
所有的默认配置均可在此处 找到。以下是我的(主)配置文件 ~/.config/helix/config.toml:
 1
 2
 3
 4
 5
 6
 7
 8
 9
10
11
12
13
14
15
16
17
18
19
20
21
22
23
24
25
26
27
28
29
30
31
32
33
34
35
36
37
38
39
40
41
42
43
44
45
46
47
48
49
50
51
52
53
54
55
56
57
58
59
60
61
62
63
64
65
66
67
68
69
70
71
72
73
74
75
76
77
78
79
80
81
82
83
84
85
86
87
88
89
90
91
92
93
94
95
96
97
theme = "tokyonight_storm"
[ editor ]
line-number = "relative" # 相对行号
completion-trigger-len = 1 # 触发自动补全的最少字符数
bufferline = "always" # 顶部显示的标签页
idle-timeout = 0 # 立刻触发自动补全
color-modes = true
# 底部状态栏
[ editor . statusline ]
left = [ "mode" , "spacer" , "version-control" , "file-name" , "spinner" , "diagnostics" ]
right = [ "position" , "primary-selection-length" , "total-line-numbers" , "file-encoding" , "file-line-ending" , "file-type" ]
[ editor . statusline . mode ]
normal = "NORMAL"
insert = "INSERT"
select = "SELECT"
# 光标设置
[ editor . cursor-shape ]
normal = "block"
insert = "bar"
select = "block"
# 缩进提示线
[ editor . indent-guides ]
render = true
skip-levels = 1
[ keys . normal ]
h = "insert_mode"
j = "move_char_left"
J = "move_prev_long_word_start"
k = "move_line_down"
i = "move_line_up"
H = "insert_at_line_start"
L = "move_next_word_end"
K = [ "move_line_down" , "move_line_down" , "move_line_down" , "move_line_down" , "move_line_down" ]
I = [ "move_line_up" , "move_line_up" , "move_line_up" , "move_line_up" , "move_line_up" ]
W = ":write"
E = ":quit"
z = { k = "scroll_down" , i = "scroll_up" }
x = [ "move_prev_word_end" , "move_next_word_start" , "trim_selections" ]
X = "extend_line_below"
[ keys . normal . w ]
w = "rotate_view"
j = "jump_view_left"
k = "jump_view_down"
l = "jump_view_right"
i = "jump_view_up"
J = [ "vsplit" , "swap_view_left" ]
K = "hsplit"
L = "vsplit"
I = [ "hsplit" , "swap_view_up" ]
[ keys . normal . g ]
j = "goto_first_nonwhitespace"
k = "move_line_down"
i = "move_line_up"
l = "goto_line_end"
h = "goto_line_start"
[ keys . select ]
h = "insert_mode"
j = "extend_char_left"
J = "extend_prev_long_word_start"
k = "extend_line_down"
i = "extend_line_up"
H = "insert_at_line_start"
L = "extend_next_word_end"
K = [ "extend_line_down" , "extend_line_down" , "extend_line_down" , "extend_line_down" , "extend_line_down" ]
I = [ "extend_line_up" , "extend_line_up" , "extend_line_up" , "extend_line_up" , "extend_line_up" ]
W = ":write"
E = ":quit"
z = { k = "scroll_down" , i = "scroll_up" }
x = [ "move_prev_word_end" , "move_next_word_start" , "trim_selections" ]
X = "extend_line_below"
[ keys . select . w ]
w = "rotate_view"
j = "jump_view_left"
k = "jump_view_down"
l = "jump_view_right"
i = "jump_view_up"
J = [ "vsplit" , "swap_view_left" ]
K = "hsplit"
L = "vsplit"
I = [ "hsplit" , "swap_view_up" ]
[ keys . select . g ]
j = "goto_first_nonwhitespace"
k = "extend_line_down"
i = "extend_line_up"
l = "goto_line_end"
h = "goto_line_start"
我的看起来还是比较长,这是因为我习惯用 jkli 代替 hjkl 进行移动,协调各个键位还是比较麻烦,但是仍然是可以接受的。
当然,目前 Helix 还不支持 macro-style 的键位映射,所以键位不可以映射为其他按键,只能调用内置命令,因此部分功能还是比较难实现的,这也是每一行都比较长的原因。
接下来我也会分开讲讲配置。
 1
 2
 3
 4
 5
 6
 7
 8
 9
10
[ keys . normal ]
h = "insert_mode"
j = "move_char_left"
J = "move_prev_long_word_start"
k = "move_line_down"
i = "move_line_up"
H = "insert_at_line_start"
L = "move_next_word_end"
K = [ "move_line_down" , "move_line_down" , "move_line_down" , "move_line_down" , "move_line_down" ]
I = [ "move_line_up" , "move_line_up" , "move_line_up" , "move_line_up" , "move_line_up" ]
主要就是把 jkli 按照其在键盘上所处的位置映射相关方向的移动命令,再用 h 实现原来的 i 的功能。
为了记忆简单,我把原来的 w 和 e 的功能移到了 J 和 L 上。然后把 K 映射为原来的 5j, I 映射为原来的 5k,这样也比较方便快速地中等距离移动。
 1
 2
 3
 4
 5
 6
 7
 8
 9
10
[ keys . normal . w ]
w = "rotate_view" # 按顺序在窗口中切换
j = "jump_view_left"
k = "jump_view_down"
l = "jump_view_right"
i = "jump_view_up"
J = [ "vsplit" , "swap_view_left" ]
K = "hsplit"
L = "vsplit"
I = [ "hsplit" , "swap_view_up" ]
Helix 的原本的窗口操作是以 Ctrl-w 为前缀,并且接下来的选项众多,也不够方便指定方向分割出窗口,于是我自己定义了一套,方便记忆,以 w 开头,小写代表切换,大小代表创建。
至于标签页,可以用 :n 或 :new 来创建一个新的标签/Buffer,用 :bc 或 :buffer-close 来关闭,切换操作见下一节。
跳转操作以 g 为前缀,大致与 Vim 类似,但跳转至行首行尾不再是 0 或 $,而是 gh 与 gl。标签页切换用 gn 或 gp,分别表示向前或向后。
跳转同样支持 Go to iefinition/implementation/references 等操作,只要有 LSP 支持。
更多操作可以参考这里 。
以下配置与上面的配置思路保持一致:
1
2
3
4
5
6
[ keys . normal . g ]
j = "goto_first_nonwhitespace"
k = "move_line_down"
i = "move_line_up"
l = "goto_line_end"
h = "goto_line_start"
先说多光标,Helix 可以通过 C 和 Shift-Alt-c 来分别向下和向上扩展一个光标,类似 VS Code 中的 Ctrl-Alt-<up>/<down>,如果想要取消多个光标,只保留最后一个,可以按 ,(注意不是 Esc)。
Helix 自带非常强大的多光标与多项选择功能,接下来的操作则更为强大。
首先,Helix 拥有许多选择操作,比如可以通过 x 来进行行选择,每按一次则扩展一行,也可以通过 % 选中整个文件,还可以用 s 来选中选区内的指定内容,通过正则表达式来匹配。比如我通过 x 选中了若干行,然后我想选择这几行中所有的数字,在每一处加一个光标,只需按一下 s,然后在屏幕底部的 select: 后输入 [0-9]+ 再按 Enter 就完成了选中。
接着是 SELECT 模式,其相当于 Vim 中的 VISUAL 模式,任何移动光标的操作都可以扩展选区,包括跳转。为什么没有 VISUAL-LINE 模式呢?因为只要在 SELECT 模式下按 x 就可以了。那 VISUAL-BLOCK 呢?多光标就可以解决这个问题,直接创建一列光标,然后左右移动即可。这样带来的好处就是简单且高效,想要同时编辑多行,只要像编辑一行一样处理即可,无需使用奇怪的 :'<,'>norm <some commands> 来实现。
以上两种可以结合使用,灵活性很高,读者可以根据文档 开发出更多的用法。
我自己把 x 换成了选中单词,X 换成选中行。
需要注意的是,如果要像我一样更改键位,SELECT 模式下的光标移动命令就不再是 move_*,而是 extend_*,所以要像下面这样稍做改动:
 1
 2
 3
 4
 5
 6
 7
 8
 9
10
11
12
13
14
15
16
17
18
19
20
21
22
23
24
25
26
27
28
29
30
31
32
33
# 注意是 keys.select
[ keys . select ]
h = "insert_mode"
j = "extend_char_left"
J = "extend_prev_long_word_start"
k = "extend_line_down"
i = "extend_line_up"
H = "insert_at_line_start"
L = "extend_next_word_end"
K = [ "extend_line_down" , "extend_line_down" , "extend_line_down" , "extend_line_down" , "extend_line_down" ]
I = [ "extend_line_up" , "extend_line_up" , "extend_line_up" , "extend_line_up" , "extend_line_up" ]
z = { k = "scroll_down" , i = "scroll_up" }
x = [ "move_prev_word_end" , "move_next_word_start" , "trim_selections" ]
X = "extend_line_below"
# 之前定义的是在 NORMAL 模式下的窗口操作,现在要重新设置一遍
[ keys . select . w ]
w = "rotate_view"
j = "jump_view_left"
k = "jump_view_down"
l = "jump_view_right"
i = "jump_view_up"
J = [ "vsplit" , "swap_view_left" ]
K = "hsplit"
L = "vsplit"
I = [ "hsplit" , "swap_view_up" ]
[ keys . select . g ]
j = "goto_first_nonwhitespace"
k = "extend_line_down"
i = "extend_line_up"
l = "goto_line_end"
h = "goto_line_start"
关于选择操作,还有一部分就是匹配模式,用于完成 surround 操作,这部分下文介绍。
与 Vim 相同,用 / 或 ? 进行正向或反向查找。与 Vim 的不同之处是不管查找方向是什么,n 总是往文件末尾跳转,N 反之。
如果将查找与 SELECT 模式结合,可以做到边查找边选择。
如果想要直接查找光标下的单词或已经选中的内容,可以直接按 * 再按 /,其本质是 * 会把光标下的单词或已经选中的内容复制到寄存器 "/ 中,而查找操作默认会先用其中的内容填充,也就是说 * 做的事是选择然后 "/y 。
至于替换,更好的办法是 s 选中然后按 c 实现替换。
Helix 也支持全局查找,只要按 Space-/ 即可,第一次需要加载所有的文件,可能比较慢,后面就会很快。
进入匹配模式先按 m,然后可以选择不同类型的匹配。
Key Description Command mGoto matching bracket (TS ) match_bracketss <char>Surround current selection with <char> surround_addr <from><to>Replace surround character <from> with <to> surround_replaced <char>Delete surround character <char> surround_deletea <object>Select around textobject select_textobject_aroundi <object>Select inside textobject select_textobject_inner
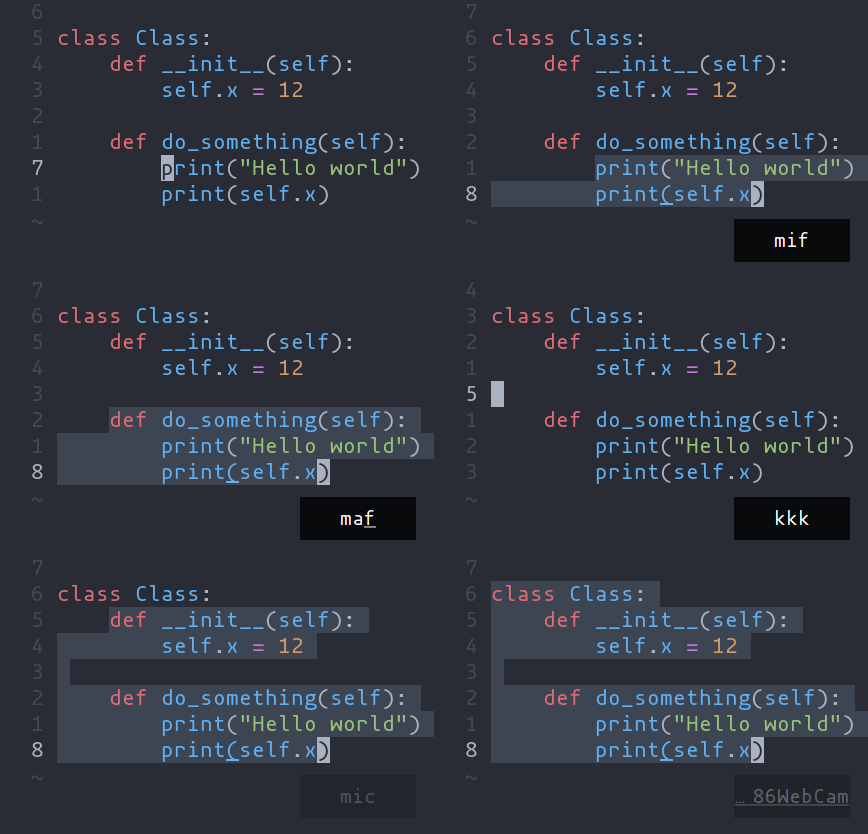
其中 TS 指 tree-sitter,用于识别 textobject。textobject 不仅可以是单词、段落,还可以是函数、类等(需要 tree-sitter 支持,不过绝大多数语言都是默认支持的):
Textobject Textobject 每一种 textobject 都有特定的字母指代:
Key after mi or ma Textobject selected wWord WWORD pParagraph (, [, ', etc.Specified surround pairs mThe closest surround pair fFunction cClass aArgument/parameter oComment tTest gChange
假设我要选择一个单词,可以按 miw,选择整个函数可以按 maf,可谓是十分强大。
因为有了 tree-sitter 的支持,Helix 支持通过 unimpaired 操作在不同的语法元素之间移动:
Navigating using tree-sitter textobjects LSP 配置很容易,只要按照这里 和这里 进行即可。
以 Rust 为例,首先安装 rust-analyzer 等组件:
1
$ rustup component add rust-analyzer rustfmt clippy
然后新建 ~/.config/helix/languages.toml,输入以下内容:
1
2
3
4
5
[[ language ]]
name = "rust"
auto-format = true
language-server = { command = "rustup" , args = [ "run" , "stable" , "rust-analyzer" ] }
config . check . command = "clippy"
配置完成后,除了上文提到的跳转,还可以通过 Space-s 打开 symbol 列表,通过 Space-r 重命名,通过 Space-a 执行 code actions 等。
Code Actions Helix 还有许多功能,这里就不再赘述了。
类似 vim-airline 的效果:
1
2
[ editor ]
color-modes = true
Helix 自带许多主题,只需用 :theme 命令即可预览和选择,如果要永久设置,就在 config.toml 中加上 theme = "theme"。(我的是 Tokynight Storm 主题)
用了一段时间后我发现行号颜色太暗,选中高亮也太暗,于是开始自定义主题。在 ~/.config/helix/themes 下新建 my_tokyonight_storm.toml:
1
2
3
4
5
inherits = "tokyonight_storm"
[ palette ]
background_highlight = "#4a527a"
foreground_gutter = "#545c83"
inherits 是一个很好的功能,可以让我们只对一小部分进行微调。
如果想要透明背景,可以参考下面这个 my_tokyonight_storm_transparent.toml:
 1
 2
 3
 4
 5
 6
 7
 8
 9
10
11
12
13
14
inherits = "tokyonight_storm"
"ui.background" = { fg = "foreground" }
"ui.cursorline.primary" = {}
"ui.help" = { fg = "foreground" }
"ui.menu" = { fg = "foreground" }
"ui.menu.selected" = { bg = "background_highlight" }
"ui.popup" = { fg = "foreground" }
"ui.statusline" = { fg = "foreground" }
"ui.statusline.inactive" = { fg = "foreground_gutter" }
[ palette ]
background_highlight = "#4a527a"
foreground_gutter = "#5e6793"
其效果就是文章上面的那一张图片。
Helix 虽然还不是那么完善,但是仍然是值得试一试的编辑器,未来它应该会更加强大。


